Your choice of cap embroidery styles can change logo readability because logos can look great on a screen, but when they are stitched on a cap, the story might change. Choosing the right one before you place an order is how you can save your design from getting blurred.
Below, we go through flat stitching, raised 3D puff, appliqué work, patches and special threads. Each one gets an honest look at its strengths and its limits.
What Are the Main Cap Embroidery Styles?
There are four main cap embroidery styles, each one is stitched in the same way by a machine that follows a digital stitch file and sews the design into the fabric. Here is how the styles stack up against each other.
| Style | What it looks like | Good for | Main drawback |
| Flat embroidery | Smooth stitching close to the fabric | Most logos, small text, uniforms | Thin lines and gradients do not stitch well |
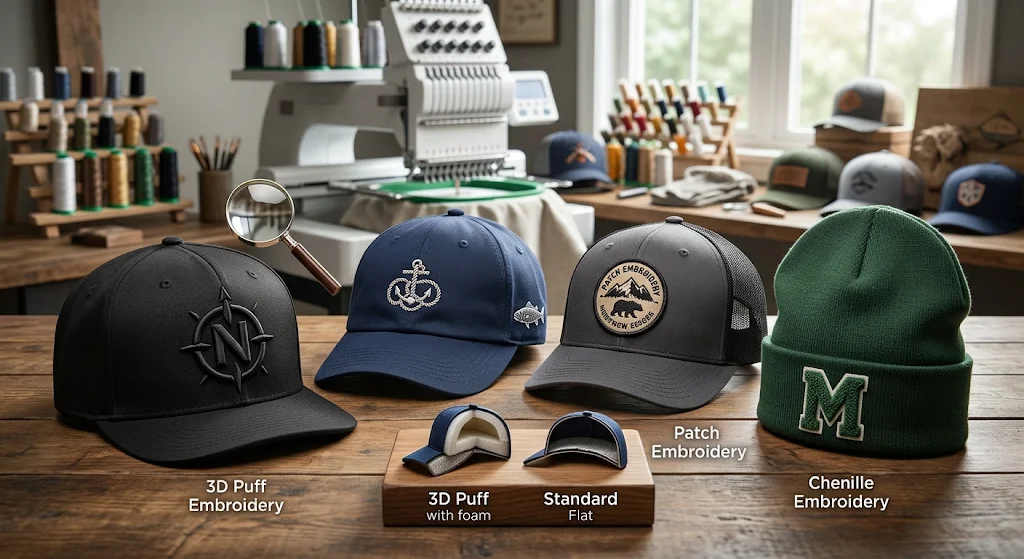
| 3D puff embroidery | Raised stitching over a foam base | Short, bold names on structured caps | Not suited to small text or thin lines |
| Mixed flat and puff | Raised main word with flat details | A bold name with small extras | Needs careful spacing |
| Embroidered patch | Separate badge sewn or pressed on | Detailed badges, six-panel fronts | Large patches can look stiff |
| Tonal embroidery | Thread close to the cap colour | Quiet, upmarket branding | Hard to read from a distance |
| Metallic thread | Gold or silver shine | Simple marks for events and gifts | Less forgiving with fine detail |
Flat Embroidery: The Everyday Choice
With flat embroidery, the thread goes directly into the cap and lies close to the surface. It copes with a huge range of logos, and it takes daily wear in its stride.
How Flat Embroidery Works
- Your design is converted into a stitch file to tell the machine where each thread will go.
- Long, satin stitches are added for lettering and borders.
- Short stitches to cover larger shapes and create an even finish are added.
When Flat Embroidery Is the Right Call
- Small text, details, and less colours.
- Suitable for both stiff and soft custom caps.
- Because of flat stitching, small letters stay readable.
The Catch With Flat Embroidery
- Lines under 1 mm may break.
- 5 mm Letters can become unclear.
- They cannot capture gradients.
3D Puff Embroidery
In 3D puff embroidery, the stitches go over a layer of foam. That foam pushes the design up off the cap, giving a chunky, raised finish. It picks up the light and stays readable even from across a room.
How 3D Embroidery Is Made
- Flat sections of the design are stitched first.
- A piece of foam is laid over the part that needs a 3D effect.
- Dense satin stitches go over the foam along the edges, the needle perforates it.
- The leftover foam is removed.
- Small scraps or foam are removed with a touch of heat.
Designs That Work
- Block capitals
- chunky initials
- simple icons
- at least 5 mm letters to hold shape.
- Short satin stitches
- Simple initials
Where 3D Puff Falls Short
- Stiff backing is needed to hold the shape.
- Flexible fabric can make the raised design sag or look uneven.
- Costs more than normal embroidery.
Which Should You Pick?
| If your design has… | Go for |
| Small text or a strapline | Flat embroidery |
| A short name in thick capitals | 3D puff embroidery |
| A bold name plus small details | Mixed flat and puff |
| Gradients or photo detail | A sublimated or woven patch |
| A soft, unstructured cap | Flat embroidery or a patch |
Mixing Flat and Puff on One Cap
With mixed puff and flat embroidery, the main word is raised above the surface in puff while the other small elements stay flat to the surface. Give some breathing room to both parts because if they are packed too tightly, the raised edges can crowd out and mix the finer details that are next to it.
Patch Styles you can add on a cap
Most people do not prefer direct embroidery on the caps, so they customise their caps with custom patches because they provide many other materials and looks than direct embroidery.
| Patch type | Finish | Detail level | Good for |
| Embroidered | Textured thread | Medium | Clubs, workwear, uniforms |
| Woven | Flat and smooth | High | Small text and fine logos |
| Leather | Pressed or engraved | Low to medium | Heritage and outdoor brands |
| PVC | Soft and rubbery | Medium | Wet, muddy, outdoor use |
| Chenille | Fluffy loops | Low | Big letters, varsity style |
| Sublimated | Printed | Very high, full colour | Gradients and photos |
| Sequin | Sparkly | Low | Events and fashion |
| Appliqué | Fabric with a stitched edge | Low to medium | Large, bold shapes |
Thread Effects That Change the Look
You can shift the whole mood of a design just by changing the thread, while keeping the same style. The two effects below can be used with flat embroidery and also with other patch types.
Tonal Embroidery
Tonal embroidery matches the thread to the colour of the cap, for example, navy on navy. Here, the logo is seen through texture.
The downside
- People have to be fairly close to read it.
- For custom caps for branding, tonal is the wrong call.
Metallic Thread
Metallic thread has a metal-effect foil wound around its core, which gives a gold or silver sheen. Simple shapes, outlines, and short words all work well to stand out.
The downside
- Fine detail is harder, as metallic thread is thicker than standard thread.
- Small elements can get lost.
Where Can You Put Embroidery on a Cap?
Most fitted caps can be embroidered in four places: the front panel, each side panel, and the back just above the strap.
The Front Panel
On a standard adult cap, you have roughly 10 to 12 cm of width and 5 to 6 cm of height on the front. Count the panels before you sign off your design. Six-panel caps have a seam in the centre of the front. Five-panel caps have a single smooth front panel.
You will find both builds when designing a custom baseball cap, so check which one you are ordering. For most logos, stitching over the centre seam is not a problem but tiny details are the exception.
Sides and Back
The side panels and the back are good spots for a short line of text, a flag, a web address or a squad number. Keep these pieces to a few centimetres wide, so they fit cleanly between the seams.
Brim
Brim embroidery is an option on some caps, but not every cap allows it. Ask first before building a design around the brim.
How to Prepare Your Logo for Cap Embroidery
Thread-friendly artwork makes everything easier. Follow these steps and the mockup stage will go much faster.
- Send your cleanest file. Vector artwork is ideal. It is made from lines and shapes instead of pixels, and comes in formats such as AI, EPS, PDF or SVG. Do not have one? A sharp PNG or JPG is still a workable starting point.
- Reduce the colours. The fewer thread colours, the cleaner the stitching. Any gradients will need to be turned into solid blocks.
- Thicken lines and enlarge small text. The size limits in the flat and puff sections above are a good guide.
- Pick your style. Use the tables earlier in this guide to match your logo with flat, puff, or a patch.
- Request a mockup. This is an image of your design on the cap, made before any stitching happens. Design help and mockups from us are free, so you can tweak things first.
- Approve and order. We have no minimum order, and turnaround is 10 to 14 days.
How to Wash an Embroidered Cap
If you want the embroidery to stay looking fresh, wash the cap by hand. A washing machine or tumble dryer can bend the brim and squash 3D puff flat.
- Fill a sink with cool water and add a little mild detergent.
- Work on any marks with a soft cloth or an old soft toothbrush. Brush lightly around the stitching instead of scrubbing at it.
- Rinse the cap in clean, cool water.
- Squeeze the water out by pressing it into a towel. Avoid wringing or twisting.
- Leave it to air dry on something rounded, like a rolled-up towel, well away from radiators and strong sunlight.
Frequently Asked Questions
Does embroidery come off in the wash?
The design is stitched directly on the caps, so it does not come off easily until you snip the threads.
Can I order just few embroidered caps?
There is no minimum order with us, so you can order a few caps to check quality and design.
How long does a custom embroidered cap order take?
Turnaround is 10 to 14 days. If you need a rush order, we can get it done as well.
Can you embroider a photo on a cap?
Thread only comes in solid colours, so a photo would end up looking rough, instead, you can print a photo on your cap.
Is embroidery better than printing on a cap?
Embroidery lasts longer than printing and does not crack or peel.
How many thread colours can a cap logo have?
A logo can have as many colours, but with fewer colours it stays clean and readable
Can embroidery be removed from a cap later?
You can snip the threads and remove it, but it will leave tiny holes in the cap.
Choosing the Right Embroidery Style
Embroidery can change how your cap looks as it can be made into flat, 3D and metallic styles each looks different. The other option to customize your plain caps are custom patches as we have listed all the styles for you, so that you know what works best for you and your brand.
